
Process for creating a new Facebook App
Facebook App
Step 1.
Before you begin this step, all Runway URLs should have been supplied by Runway for your project containers. There will be 2 different formats. One set will look like this with a CloudFront face (daonoovlpcgx2.cloudfront.net) and the others will be the vanity map URL such as atwatermaps@cedarwoods.com.au/community - you will need to input these in the basic and advanced steps in this article.
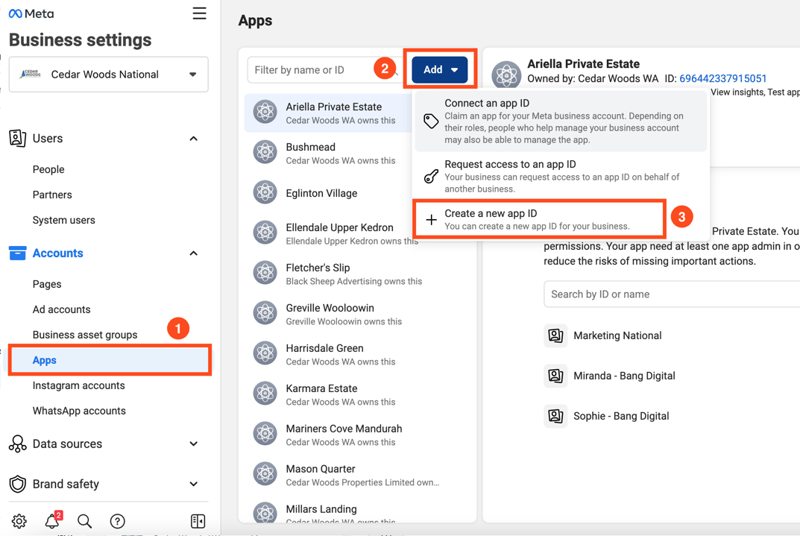
- Log into Facebook Business Manager and navigate to business settings via the cog icon in the bottom left of the page.

- Select APP on the left then choose ADD and in the drop-down select "Create a new app ID"
Select the app type "Business" and click Next.

Name the App for your project and associate it with the Facebook Business Account that will control this (EG: marketingwa@cedarwoods.com.au) then click create (the term Facebook is not permitted in the app name)

- Copy the App ID and add it to the Technology Configuration Document Here (Facebook App Tab)

** Please note: To edit an existing app, navigate to the same app area in Facebook Business manager and select the option to Open In App Dashboard

Facebook App Basic Config
Step 2:
- Underneath settings, select the basic option

Add your domains for Runway and Cedar Woods under App domains
Include:
- www.cedarwoods.com.au (with www)
- The maps branded URL - EG: eglintonmaps.cedarwoods.com.au
- The Cloudfront URL supplied by Runway (EG: daonoovlpcgx2.cloudfront.net)
- Also include the land, packages, townhomes etc -
atwatermaps.cedarwoods.com.au/community/land
atwatermaps.cedarwoods.com.au/community/packages
atwatermaps.cedarwoods.com.au/community/townhomes
Add a Contact email address - the same one used to set up the app.
Add privacy policy URL into - https://www.cedarwoods.com.au/privacy-policy
Add Terms of use URL - https://www.cedarwoods.com.au/Terms-of-Use
Click Save

Facebook App Advanced Config
Step 3:
- On the left menu under settings, choose Advanced
- Make sure social discovery is toggled on
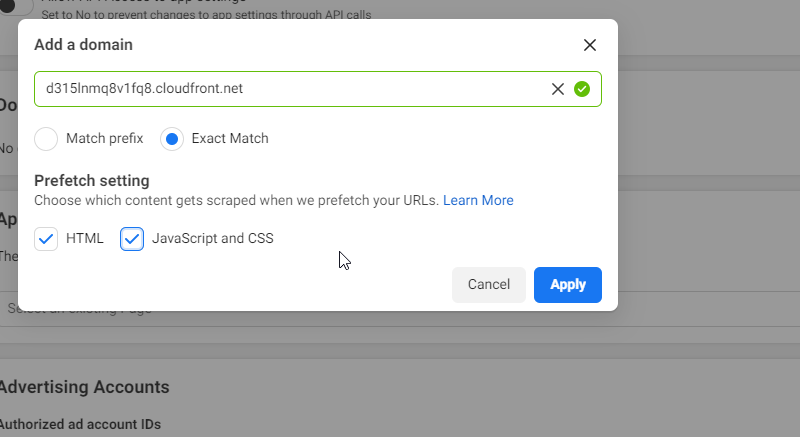
- Scroll to the Domain Manager area and click on Add a Domain
- Enter the previous Cloudfront domains as well as the subdomains from the basic step. You will need to include the full paths for both and include https://
So for example:
https://d315lnmq8v1fq8.cloudfront.net
https://d315lnmq8v1fq8.cloudfront.net/community
https://d315lnmq8v1fq8.cloudfront.net/community/packages
https://eglintonmaps.cedarwoods.com.au/community/
https://eglintonmaps.cedarwoods.com.au/community/packages - When adding each individually select
Exact Match
HTML & JavaScript and CSS
Toggle on the Share Redirect Allow List and click save changes

Facebook APP

Facebook APP Finalisation
Step 5:
- The Runway URL must be added to the CORS Configuration / be whitelisted so that the URL is not blocked by our server
- Open a new ticket using CapGemini support desk
- You will provide both CloudFront URL and the branded subdomain
- EG:
d315lnmq8v1fq8.cloudfront.net
eglintonmaps.cedarwoods.com.au - Request that both domains be added to the CORS config. When requesting a ticket, you will be prompted for a service area - choose Azure/0365
