
Creating List
If you're looking to pull enquiry information or purchaser information for a specific stage, this help guide has you covered!
Walking you step by step through the process of cloning the list template into HubSpot, this guide will help you easily create and manage lists that can be used to segment and target contacts in your database.
Creating Active Lists
Active lists automatically update their members based on it's criteria. Records will join the list when they meet the criteria and leave the list when they no longer meet the criteria.
If you don't want to clone using the template above, and would like to create your own filters, use the below instructions.
In order to create your own active list, complete the following steps.
- In your HubSpot account, navigate to Contacts > Lists.
- In the upper right, click Create List.
- In the left panel, select Contact-based to create a list of contacts, or Deal-based to create a list of deals.
- In the right panel, enter a name for the list and select if you want an Active list or a Static list. You can also view the number of lists you've used on this page.
- In the upper right, click Next.
- In the left panel, set the criteria for the contacts or deals you want to segment. You can select up to 250 filters per list.
- Select Add filter.
- Scroll or type to search, then select a filter category.
- Within the category, scroll or type to search, then select the property or activity to filter by.
- Select an option for the property or activity, then set your criteria based on the field type:
- Dropdown select or checkbox: click the dropdown menu and select the checkboxes to the left of the values.
- Text: Click the Add options field and type to enter a text value. If you’re adding multiple options, separate each value with a semicolon (e.g. Boston; Chicago; New York).
Understanding Purchaser Data Information
|
Deal Record (Sales with HubSpot Deal ID) |
|
Contract Accepted Date |
|
CRM Contract Price (Can also use Amount) |
|
Enquiry Status (Used for both Sales Status Reason and Lost Status Reason) |
|
Stage |
|
Lot |
|
External Sales Agent |
|
Settlement Date |
|
CRM Date Contract Fell Over |
Creating and Using Folders
To create list folders:
- In your HubSpot account, navigate to CRM > Lists.
- In the upper right, click the Folders tab.
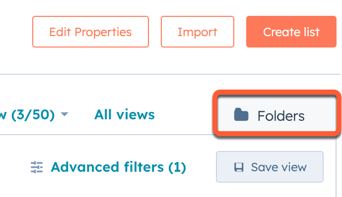
- Click Create folder.
- In the dialog box, enter a Folder name, then click Create.
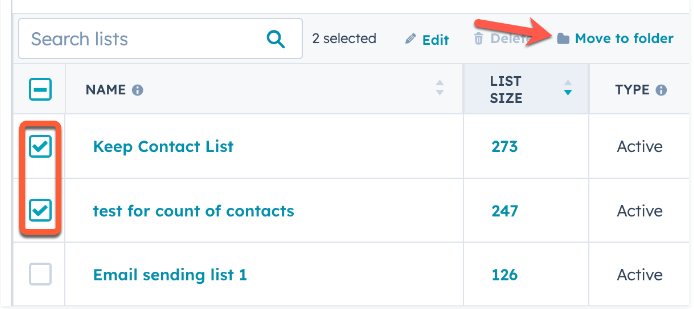
To move lists into a folder:
- Return to the main lists index page by clicking the All lists tab.
- To move multiple lists into a folder, select the checkbox next to any lists that you want to move, then click Move to folder at the top of the table. Then, in the dialog box, select a folder, then click Move.
- To add a single list into a folder, hover over a list, click the More dropdown menu, then select Move to folder.
- To add a list to a folder from the list editor, click the name of a list, then in the upper right, click Actions and select Move to folder.